关于 Truffle 简单来说,Truffle 就是一个用于开发以太坊合约的集成框架,其支持的很多命令可以方便灵活的支持编译、测试、部署合约或者DApp。关于 Truffle 更详细的介绍,可以参考Truffle 官方文档
下面从编写、编译和部署一个简单的合约来看一下 Truffle 框架的使用。
下面以项目 HelloToken 为例,各个步骤的操作都假设已安装了 truffle 和 geth 环境。
使用 truffle 创建项目 创建 HelloToken 目录,并使用 truffle init 命令来生成基本的目录结构
1
2
3
4
5
6
7
8
9
10
11
12
13
14
➜ temp mkdir HelloToken ➜ temp cd HelloToken ➜ HelloToken truffle init Downloading... Unpacking... Setting up... Unbox successful. Sweet! Commands: Compile: truffle compile Migrate: truffle migrate Test contracts: truffle test ➜ HighQualityTokens
从日志可以看出,truffle 会首先去 Downloading 的,对于 init 是从 init repo
1
2
3
4
5
6
7
8
9
10
11
12
➜ HelloToken tree . ├── contracts │ └── Migrations.sol ├── migrations │ └── 1_initial_migration.js ├── test ├── truffle-config.js └── truffle.js 3 directories, 4 files ➜ HelloToken
生成的项目目录结构:
contracts/ : 存放所有使用 solidity 编写的合约;migrations/ : 部署脚本文件;tests/ : 测试用例文件;truffle.js : Truffle 配置文件;
编写合约 我们可以使用 truffle create 命令来创建一个新合约:
1
2
3
4
5
6
7
8
9
10
11
12
13
14
➜ HelloToken truffle create contract HelloToken ➜ HelloToken tree . ├── contracts │ ├── HelloToken.sol │ └── Migrations.sol ├── migrations │ └── 1_initial_migration.js ├── test ├── truffle-config.js └── truffle.js 3 directories, 5 files ➜ HelloToken
可以看到在 contracts/ 下面新建了一个 HelloToken.sol 文件:
1
2
3
4
5
6
7
pragma solidity ^0.4 .4 ; contract HelloToken { function HelloToken ( } }
下面添加我们自己的代码进来:
1
2
3
4
5
6
7
8
9
10
11
12
13
14
15
16
17
18
19
20
21
22
23
24
25
26
27
28
29
30
31
32
33
34
35
36
37
38
39
40
41
42
43
44
45
46
47
48
49
50
51
52
pragma solidity ^0.4 .4 ; contract HelloToken { address private creator; address private lastCaller; string private message; uint private totalGas; function HelloToken ( creator = tx.origin; totalGas = tx.gasprice; message = 'Hello token' ; } function getMessage (constant returns (string ) return message; } function getLastCaller (constant returns (address ) return lastCaller; } function getCreator (constant returns (address ) return creator; } function getTotalGas (constant returns (uint ) return totalGas; } function setMessage (string newMessage ) message = newMessage; lastCaller = tx.origin; totalGas += tx.gasprice; } }
编译合约 使用 truffle compile 命令来编译合约,如下:
1
2
3
4
5
6
7
8
9
➜ HelloToken truffle compile Compiling ./contracts/HelloToken.sol... Compiling ./contracts/Migrations.sol... Compilation warnings encountered: ... Writing artifacts to ./build/contracts ➜ HelloToken
编译完成之后,会将编译生成的各类文件存放在 ./build/contracts/ 目录下(该目录如果不存在的话,会自动创建)。
compile 命令的默认选项是增量编译,如果需要全部重新编译,则加上 –all 选项即可,如下:
1
2
3
4
➜ HelloToken truffle compile --all Compiling ./contracts/HelloToken.sol... Compiling ./contracts/Migrations.sol... ... ...
部署至 Rinkeby 在正式部署到 testnet 或 mainnet 之前可以使用 develop 命令来启动一个本地开发的区块链环境,因为我们后面需要使用 web3j 在 Rinkeby 上来调用我们的合约,因此,这里我们部署到 Rinkeby 网络。
配置部署脚本 使用 create 添加一个新的部署文件,如下:
1
2
3
4
5
6
➜ HelloToken truffle create migration deploy_contracts ➜ HelloToken ll migrations total 16 -rw-r--r-- 1 steven staff 85B 4 18 16:14 1524039268_deploy_contracts.js -rw-r--r-- 1 steven staff 129B 4 18 15:41 1_initial_migration.js ➜ HelloToken
生成了一个缺省的部署文件 1524039268_deploy_contracts.js,其内容如下:
1
2
3
module .exports = function (deployer ) };
注:部署文件的文件名要求必须以数字为前缀,该数字被用于跟踪对应的部署步骤已完成。
我们这里只有一个合约文件,因此部署脚本内容如下:
1
2
3
4
5
6
7
var HelloToken = artifacts.require("./HelloToken.sol" );module .exports = function (deployer ) deployer.deploy(HelloToken); };
其中:
artifacts.require : 返回后续部署脚本中使用的合约,如这里返回了 HelloToken(这个名称必须要和 HelloToken.sol 中定义的合约名相同,而不是随便取的变量名);module.exports : 所有的部署步骤多必须通过 module.exports 导出一个函数,该函数必须接受至少一个 deployer 实例参数作为其第一个参数,deployer 主要为了帮助更清晰的提供部署;如代码中我们要求部署 HelloToken ;
配置 rinkeby 网络 在正式 migrate 之前,我们还需要在 truffle.js 中配置 rinkeby 网络信息,如下:
1
2
3
4
5
6
7
8
9
10
11
12
13
14
15
16
17
18
module .exports = { networks: { development: { host: "127.0.0.1" , port: 8545 , network_id: "*" }, rinkeby: { host: "localhost" , port: 8545 , from : "0x0333a5743e47afec5164db26198a7980e117ae09" , network_id: 4 , gas: 4612388 }, } };
其中:
networks.rinkeby : 指定网络 rinkeby 的配置信息;host : 这里是连接到本地(localhost);from : 在 truffle 部署合约至 rinkeby 时,是需要通过该参数指定部署该合约的 EOA 账户地址的;
部署至 rinkeby 通过执行如下 migrate 命令将合约部署至 rinkeby 网络:
注:因为需要部署合约需要消耗 gas,因此需要部署此合约的 EOA 账户中有 balance,在 rinkeby 网络中可以去 facuet 上进行申请,可以参考前面的文章。
启动 geth 连接至 rinkeby 网络,并解锁我们上面创建的测试账号,以便于后面能够和 truffle 进行交互,然后执行如下命令启动 geth:
1
2
3
4
➜ ~ geth --rinkeby --syncmode fast --rpc --rpcapi db,eth,net,web3,personal --unlock 0x0333a5743e47afec5164db26198a7980e117ae09 INFO [04-18|11:16:12] Maximum peer count ETH=25 LES=0 total=25 INFO [04-18|11:16:12] Starting peer-to-peer node instance=Geth/v1.8.3-stable/darwin-amd64/go1.10 INFO [04-18|11:16:12] Allocated cache and file handles database=/Users/steven/Library/Ethereum/rinkeby/geth/chaindata cache=768 handles=1024
对于首次启动 geth 连接 rinkeby 的,可能需要耐心等待同步完成,否则在下面的部署合约过程中需要本地验证账户是否有足够的余额。在没有同步完之前,可能本地查询余额一直显示的为 0,如下:
1
2
> web3.fromWei(eth.getBalance(eth.coinbase), "ether" ) 0
在同步完成之后,此命令会显示余额(rinkeby 网络里可以在 https://faucet.rinkeby.io/ 上申请 ethers,参考之前的文章),如下:
1
2
> web3.fromWei(eth.getBalance(eth.coinbase), "ether" ) 3
下面我们可以启动 truffle migrate 来部署我们的 HelloToken 合约:
1
2
3
4
5
6
7
8
9
10
11
12
13
14
15
16
17
18
➜ HelloToken truffle migrate --reset --network rinkeby Using network 'rinkeby'. Running migration: 1_initial_migration.js Deploying Migrations... ... 0xea708a03ca49660a62ff0efe8ff3c7c99daf8298854a7602497e582a9a5f91bc Migrations: 0xdf9a8685f92b615bc8ed2f0d050ee18b1ccf5d61 Saving successful migration to network... ... 0xc384ae44f547681829bf9d5c68c3827e521e428e953290d0c4f2bcca854d1f9e Saving artifacts... Running migration: 1524039268_deploy_contracts.js Deploying HelloToken... ... 0x1cdf29d5f72237a3b57eaa0548894011680a4512dcd974f146e8f489e61a102d HelloToken: 0x156074e094c766433adc1908d1035e1ec78ba559 Saving successful migration to network... ... 0x9fd0fef0d9bedd95fba9f409f4d8e9c8c98f56f381dd0c85e24dbe33e4628d84 Saving artifacts... ➜ HelloToken
这里成功部署了我们的合约至 rinkeby 网络中,并且从日志中可以看到:
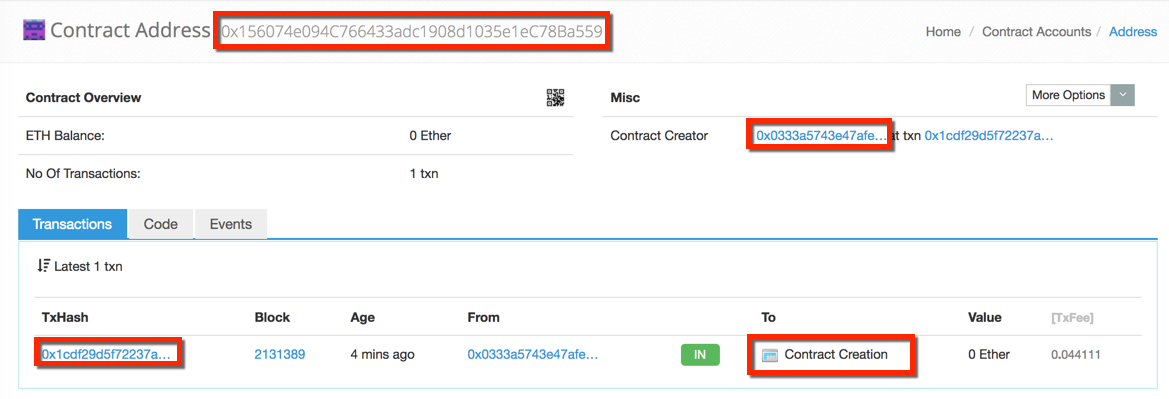
TxHash 为 0x1cdf29d5f72237a3b57eaa0548894011680a4512dcd974f146e8f489e61a102dContract Address 为 0x156074e094c766433adc1908d1035e1ec78ba559
然后我们可以在 rinkeby.etherscan.io 中查看到我们新部署的合约以及对应的 transaction:
更多部署选项参考命令 migrate
调用合约 可以通过 Truffle 的控制台(console)与部署到网络中的合约进行交互,如下命令:
1
2
➜ HelloToken truffle console --network rinkeby truffle(rinkeby)>
这里通过 –network 选项指定连接的网络配置。
我们部署的合约为 HelloToken,如果部署成功,应该可以查询到其 ABI,以及合约地址:
1
2
3
4
5
6
7
8
9
10
11
12
13
14
15
16
17
18
19
20
21
22
23
24
25
26
27
28
29
30
31
32
33
34
35
36
37
38
39
40
41
42
43
44
➜ HelloToken truffle console --network rinkeby truffle(rinkeby)> HelloToken.abi [ { inputs: [], payable: false, stateMutability: 'nonpayable', type: 'constructor' }, { constant: true, inputs: [], name: 'getMessage', outputs: [ [Object] ], payable: false, stateMutability: 'view', type: 'function' }, { constant: true, inputs: [], name: 'getLastCaller', outputs: [ [Object] ], payable: false, stateMutability: 'view', type: 'function' }, { constant: true, inputs: [], name: 'getCreator', outputs: [ [Object] ], payable: false, stateMutability: 'view', type: 'function' }, { constant: true, inputs: [], name: 'getTotalGas', outputs: [ [Object] ], payable: false, stateMutability: 'view', type: 'function' }, { constant: false, inputs: [ [Object] ], name: 'setMessage', outputs: [], payable: false, stateMutability: 'nonpayable', type: 'function' } ] truffle(rinkeby)> HelloToken.address '0x156074e094c766433adc1908d1035e1ec78ba559' truffle(rinkeby)>
可以看到这里的地址也和我们上面的日志中输出的合约地址一致。
下面我们来调用合约提供的方法,可以查看 gasPrice,获取 message 等等:
1
2
3
4
5
6
7
truffle(rinkeby)> HelloToken.deployed().then (function (instance){return instance.getTotalGas();}) BigNumber { s: 1, e: 11, c: [ 100000000000 ] } truffle(rinkeby)> HelloToken.deployed().then (function (instance){return instance.getMessage();}) 'Hello token' truffle(rinkeby)>
上面两个示例操作(getTotalGas 和 getMessage)都是属于 Read 操作,并不会消耗 Gas,也不会生成交易记录。
下面再调用一个 Write 操作 setMessage,这会引起状态的改变,因此需要消耗一定的 Gas,并且会生成对应的交易记录。
1
2
3
4
5
6
7
8
9
10
11
12
13
14
15
16
17
18
19
20
truffle(rinkeby)> HelloToken.deployed().then (function (instance){return instance.setMessage("Hello, truffle" );}) { tx: '0x99a828d6133c351ef05bfc1bc9bac7c8ccd1a5be925fd980304ce5a56fa33910', receipt: { blockHash: '0x6a03b94d3f813a631b36ca2ca798990f523b432140866d5c6bad9c713690c984', blockNumber: 2131653, contractAddress: null, cumulativeGasUsed: 59128, from: '0x0333a5743e47afec5164db26198a7980e117ae09', gasUsed: 59128, logs: [], logsBloom: '0x00000000000000000000000000000000000000000000000000000000000000000000000000000000000000000000000000000000000000000000000000000000000000000000000000000000000000000000000000000000000000000000000000000000000000000000000000000000000000000000000000000000000000000000000000000000000000000000000000000000000000000000000000000000000000000000000000000000000000000000000000000000000000000000000000000000000000000000000000000000000000000000000000000000000000000000000000000000000000000000000000000000000000000000000000000000', status: '0x1', to: '0x156074e094c766433adc1908d1035e1ec78ba559', transactionHash: '0x99a828d6133c351ef05bfc1bc9bac7c8ccd1a5be925fd980304ce5a56fa33910', transactionIndex: 0 }, logs: [] } truffle(rinkeby)> HelloToken.deployed().then (function (instance){return instance.getMessage();}) 'Hello, truffle' truffle(rinkeby)>
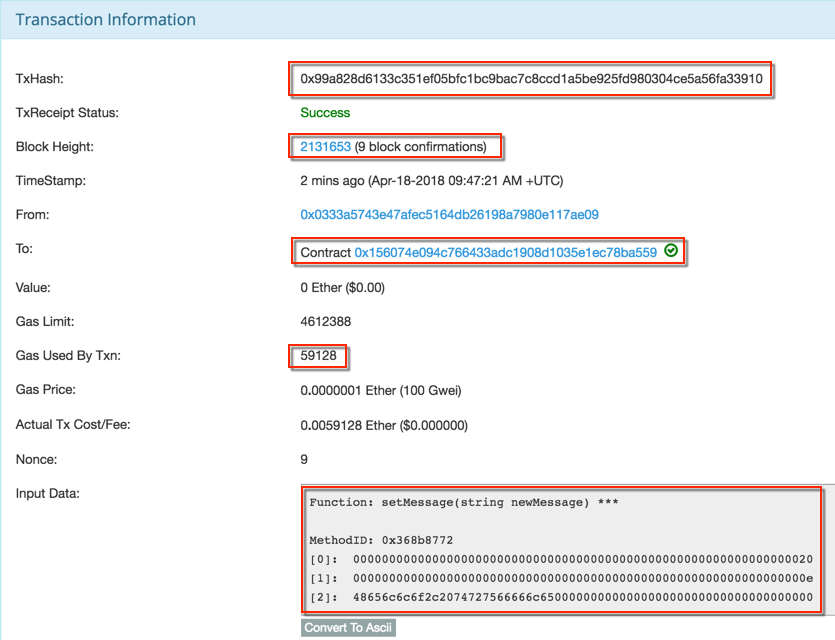
可以看到这里的第一步 setMessage 操作返回时阻塞了一会,是因为产生交易记录并需要被打包到区块中。在返回的信息中既显示了区块信息(对应的 blockHash)也显示了对应 transactionHash,并且也消耗了 Gas(gasUsed)。
我们可以在 rinkeby.etherscan.io 上查看到对应的交易详情:

